# Setting Up Navidrome with Docker
Table of Contents
Alright, you’ve got Ubuntu installed and running smoothly. Now comes the exciting part - turning your server into an actual music streaming powerhouse. We’re going to install Navidrome, and I’m going to show you exactly how to do it the right way.
What is Navidrome?
Navidrome is lightweight, open-source music streaming server that actually understands music collectors. Unlike Spotify’s algorithm-driven approach, Navidrome respects your music organization and gives you complete control over your listening experience.
Here’s what makes it awesome:
- Subsonic-compatible - Works with tons of mobile apps
- Web interface - Stream from any browser
- Fast and lightweight - Perfect for our setup
- Respects your organization - Your folders become playlists
- No phone-home nonsense - Your music stays on your server
Why Docker? (For the Newbies)
Before we dive in, let me explain why we’re using Docker instead of just installing Navidrome directly.
Think of Docker as a shipping container for software. Just like how shipping containers work the same way whether they’re on a truck, train, or ship, Docker containers work the same way on any Linux system.
Why this matters for us:
- Consistency - Navidrome will work exactly the same way every time
- Easy updates - Pull new version, restart container, done
- Clean uninstalls - Don’t like it? Delete the container, no traces left
- Isolation - If something breaks, it won’t mess up your whole system
- Reproducible - Share your config with others, they get identical setup
It’s like having a perfect installation recipe that works every single time.
Step 1: Prepare Your Music Library
Before we install anything, let’s get your music organized. You need somewhere to put your music files where Navidrome can find them.
Create Your Music Directory
Let’s keep this simple and put your music in your home directory - no need for system-wide /mnt paths that require sudo permissions.
# Create a directory for your music in your home foldermkdir -p ~/music
# Create some basic structuremkdir -p ~/music/Artists
# Check it was createdls -la ~/music
Get Some Music On There
You need to get your music files onto the server. Here are a few ways to do it:
Option 1: Copy from another computer over SSH
# From your local machine (replace paths, user and IP as needed)scp -r "/path/to/your/music/folder" $USER@192.168.1.100:~/music/Option 2: Use a USB drive
# Plug in USB drive, then mount itsudo mkdir /mnt/usbsudo mount /dev/sdb1 /mnt/usb
# Copy music files (using $USER variable so you can copy-paste)sudo cp -r /mnt/usb/Music/* ~/music/sudo chown -R $USER:$USER ~/music/
# Unmount when donesudo umount /mnt/usb
Step 2: Create Your Docker Compose Configuration
Docker Compose lets us define our entire setup in a simple text file. Create a directory for your Navidrome setup:
# Create directory for Navidromemkdir -p ~/navidromecd ~/navidrome
# Create the docker-compose.yml filenano docker-compose.yml
Now paste this configuration into the file:
services:  navidrome:    image: deluan/navidrome:latest    container_name: navidrome    ports:      - "4533:4533"    environment:      - ND_ENABLESHARING=true    restart: unless-stopped    volumes:      - "./data:/data"      - "${HOME}/music:/music:ro"
  airsonic-refix:    ports:      - "23880:80"    image: tamland/airsonic-refix:latest    container_name: airsonic    restart: unless-stopped    environment:      - SERVER_URL=http://localhost:4533
Note: This configuration uses ${HOME} and $USER variables so you can copy-paste these commands without having to replace your username everywhere.
Let me explain what this does:
Navidrome container:
image: deluan/navidrome:latest- Uses the official Navidrome Docker imageports: "4533:4533"- Makes Navidrome available on port 4533ND_ENABLESHARING=true- Lets you share music with others"${HOME}/music:/music:ro"- Maps your music folder (using $HOME variable so it works for any user)restart: unless-stopped- Automatically restarts if it crashes
Airsonic Refix container:
- This is an alternative web interface for Navidrome that looks way better
ports: "23880:80"- Available on port 23880- Uses the same Navidrome backend, just prettier frontend
Save the file (Ctrl+X, then Y, then Enter).
Step 3: Start Everything Up
Time to fire up your music server:
# Make sure you're in the navidrome directorycd ~/navidrome
# Start the containersdocker compose up -d
# Check if everything is runningdocker compose ps
You should see both containers running. If something’s wrong, check the logs:
# Check Navidrome logsdocker compose logs navidrome
# Check Airsonic logsdocker compose logs airsonic-refix
Step 4: Access Your Music Server
If everything worked, you now have two ways to access your music:
Navidrome (original interface):
Open your browser and go to: http://your-server-ip:4533
Airsonic Refix (prettier interface):
Open your browser and go to: http://your-server-ip:23880
First Login
When you first access Navidrome, it will ask you to create your admin account. This is actually better than having default credentials - you set up your own secure login right from the start.
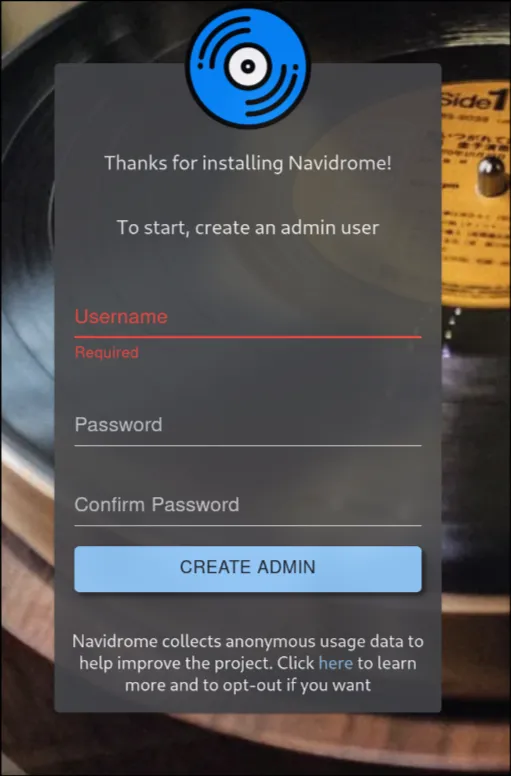
- Create your admin account:
- Choose a username (doesn’t have to be “admin”)
- Set a strong password
- This becomes your main administrator account
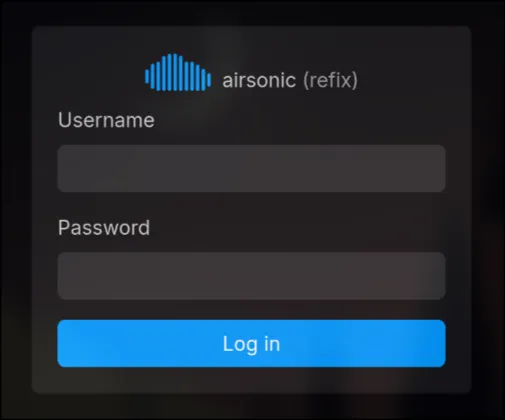
- For Airsonic Refix: Use the same Navidrome credentials you just created
Step 5: Initial Setup
Configure Your Music Library
Navidrome should automatically scan your ~/music folder. If it doesn’t find your music:
- Go to Settings → Library
- Check that the music folder path is correct
- Click “Full Rescan” if needed
Test Your Setup
- Browse your music collection
- Try playing a song
- Test both the Navidrome and Airsonic interfaces
- See which one you prefer (I personally love Airsonic Refix)
Step 6: Mobile Access
The beauty of Navidrome is that it works with tons of mobile apps:
Android:
- Symfonium (my favorite)
- DSub
- Tempo
iOS:
- play:Sub
- Amperfy
- flo
More: more Navidrom Apps
Just point any Subsonic-compatible app to:
- Server:
http://your-server-ip:4533 - Username/Password: Your Navidrome credentials
Troubleshooting Common Issues
Can’t access the web interface?
- Check if the containers are running:
docker compose ps - Make sure the firewall allows the ports:
sudo ufw allow 4533andsudo ufw allow 23880 - Verify your server’s IP address:
ip addr show
No music showing up?
- Check file permissions:
ls -la ~/music - Make sure your music files are in common formats (MP3, FLAC, M4A)
- Try a manual rescan in Settings → Library
Managing Your Server
Useful Docker Commands
# View running containersdocker compose ps
# View logsdocker compose logs -f navidrome
# Restart everythingdocker compose restart
# Stop everythingdocker compose down
# Update to latest versionsdocker compose pull && docker compose up -d
Updating Navidrome
When new versions come out:
cd ~/navidromedocker compose pulldocker compose up -d --force-recreateDocker will automatically download the new version and restart your containers.
Next Steps
You now have a fully functional music streaming server! But we’re not done yet. In upcoming posts, I’ll cover:
- Advanced Navidrome configuration - Playlists, users, and sharing
- Setting up external access - Stream your music from anywhere
- Backup strategies - Protecting your setup and music
- Music library management - Using Beets for perfect organization
- Mobile app recommendations - The best clients for your phone
Congratulations - you’re now streaming your own music, on your own terms, with your own server. No algorithms, no ads, no corporate oversight. Just your music, the way you want it.
Welcome to the world of self-hosted music streaming!